> ## Documentation Index
> Fetch the complete documentation index at: https://docs.upsolve.ai/llms.txt
> Use this file to discover all available pages before exploring further.
# Frontend Setup
> Set up frontend for dashboard deployment
Deploy your analytics in your frontend by embedding your application as an iFrame. An application renders the current user's space — the dashboards and charts they have access to.
Please click on the Deploy button in the Hub.
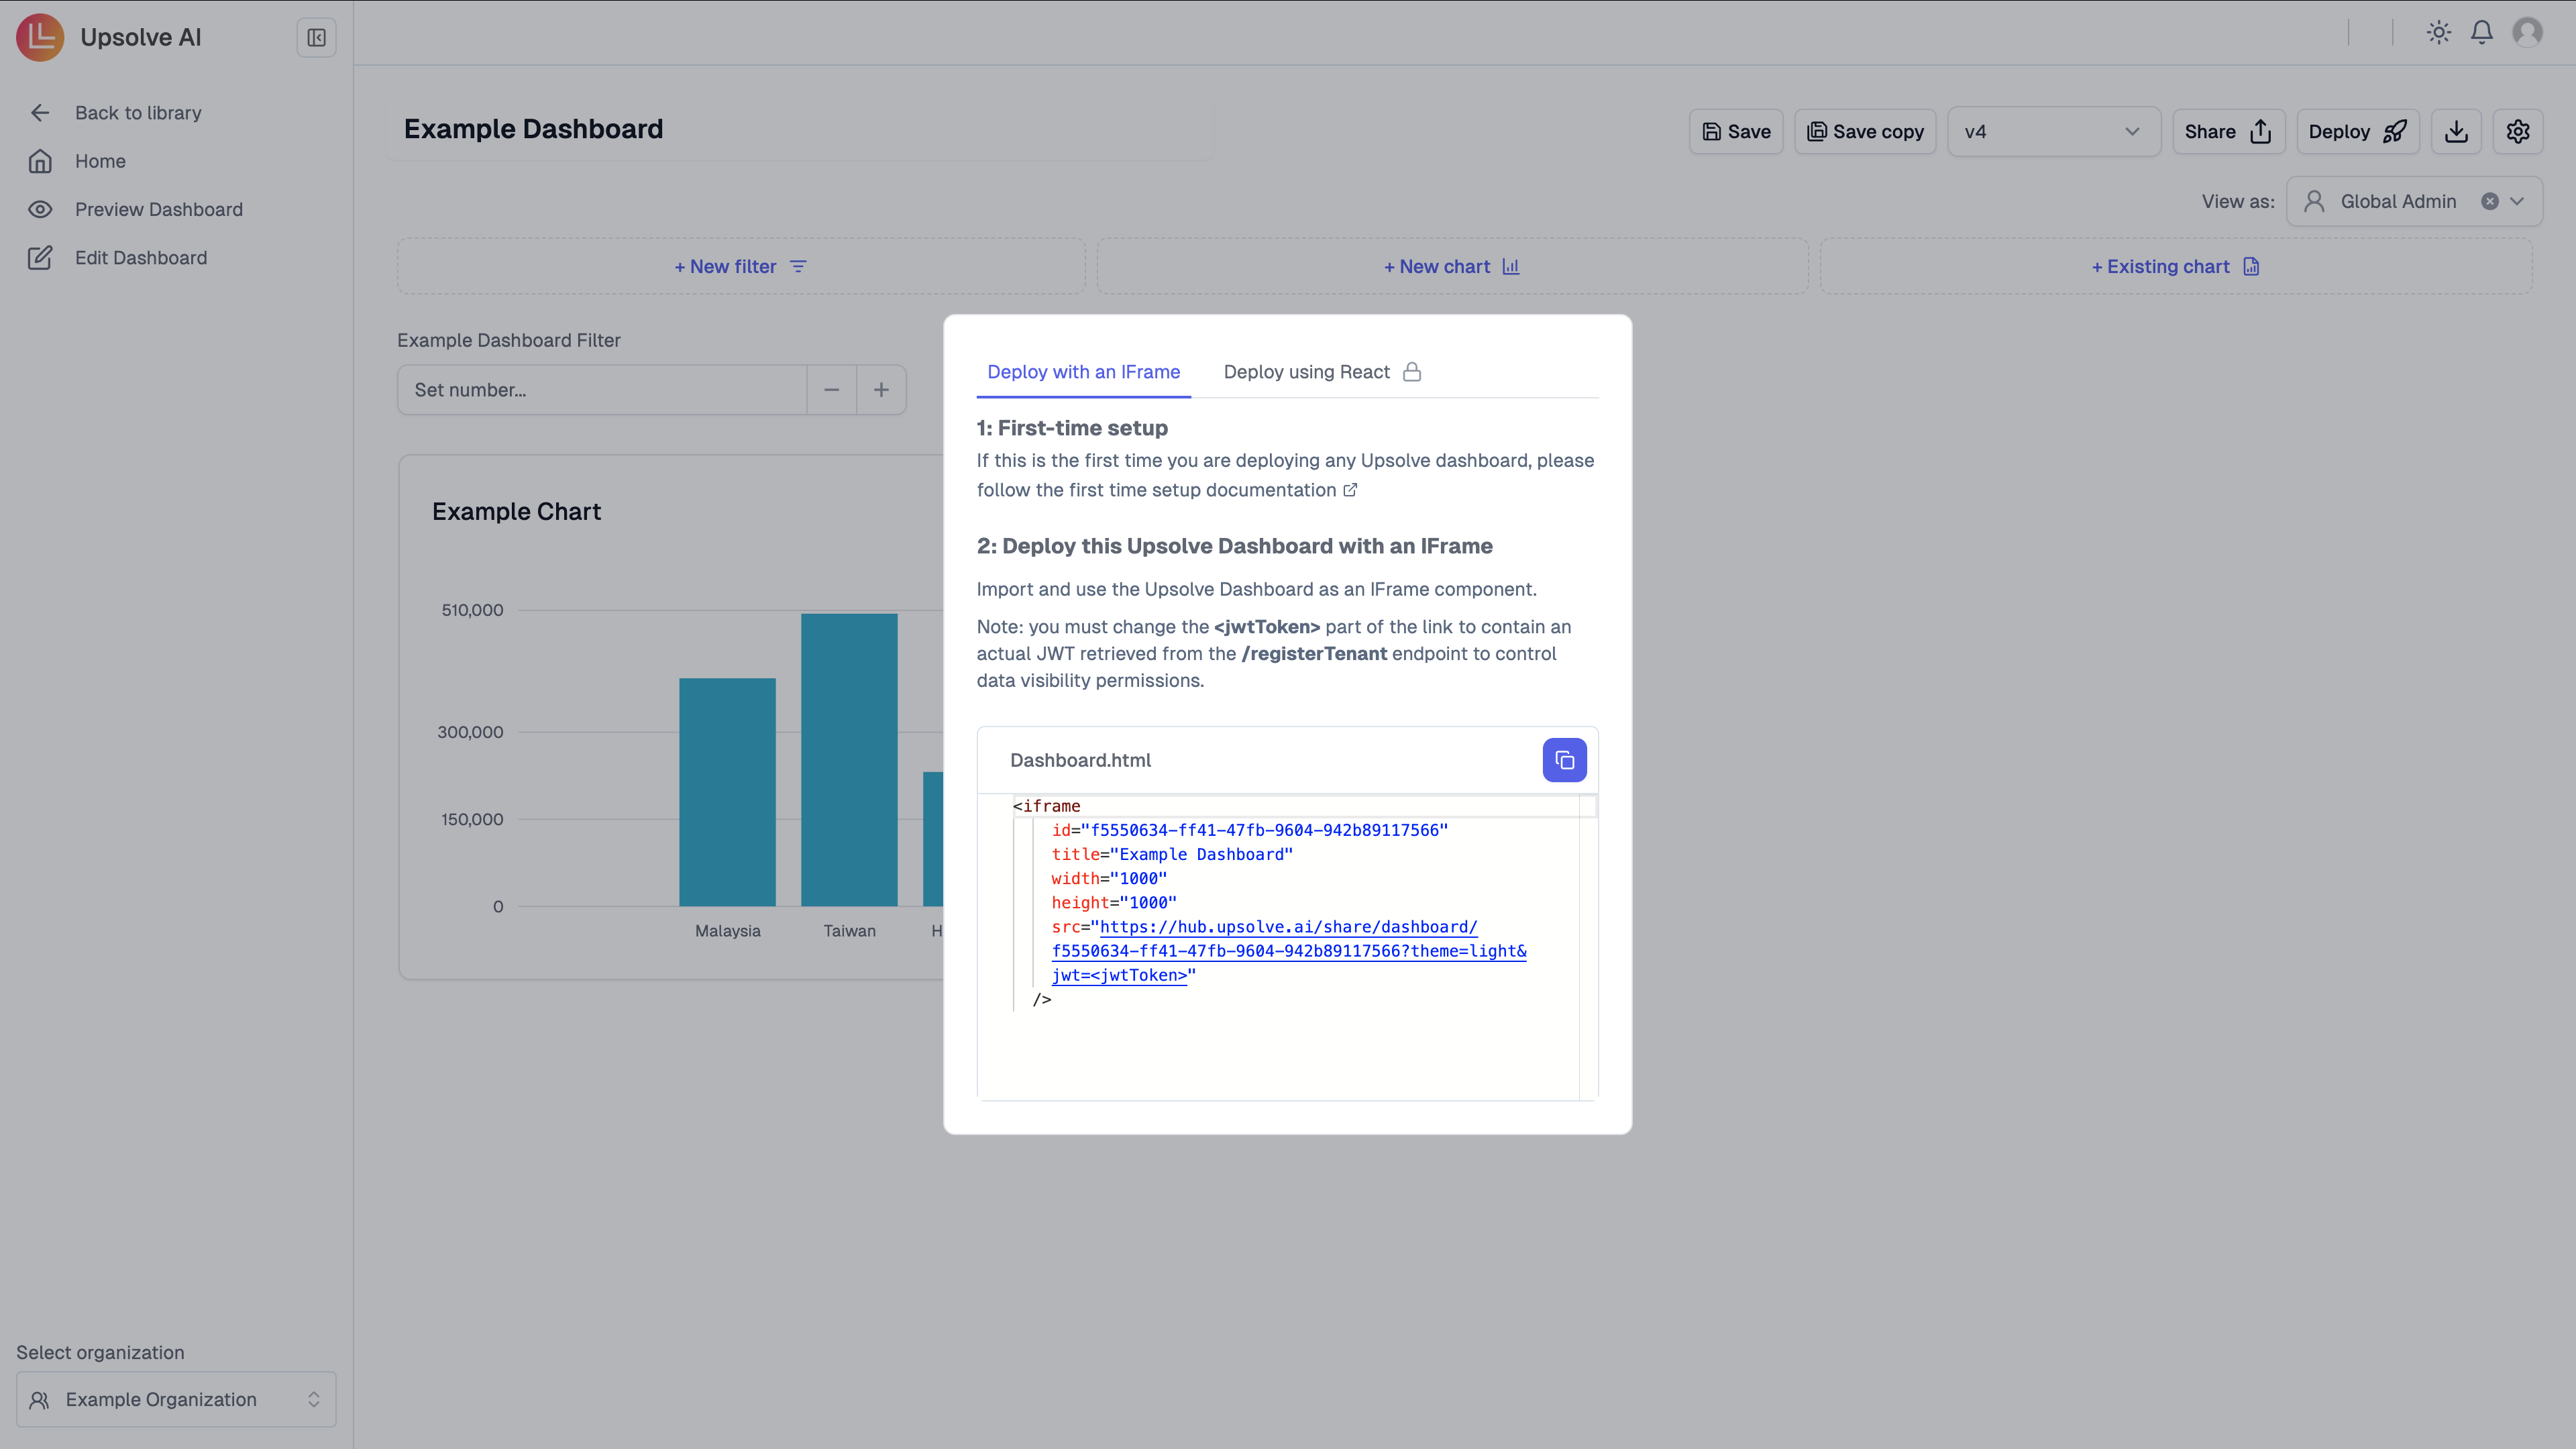
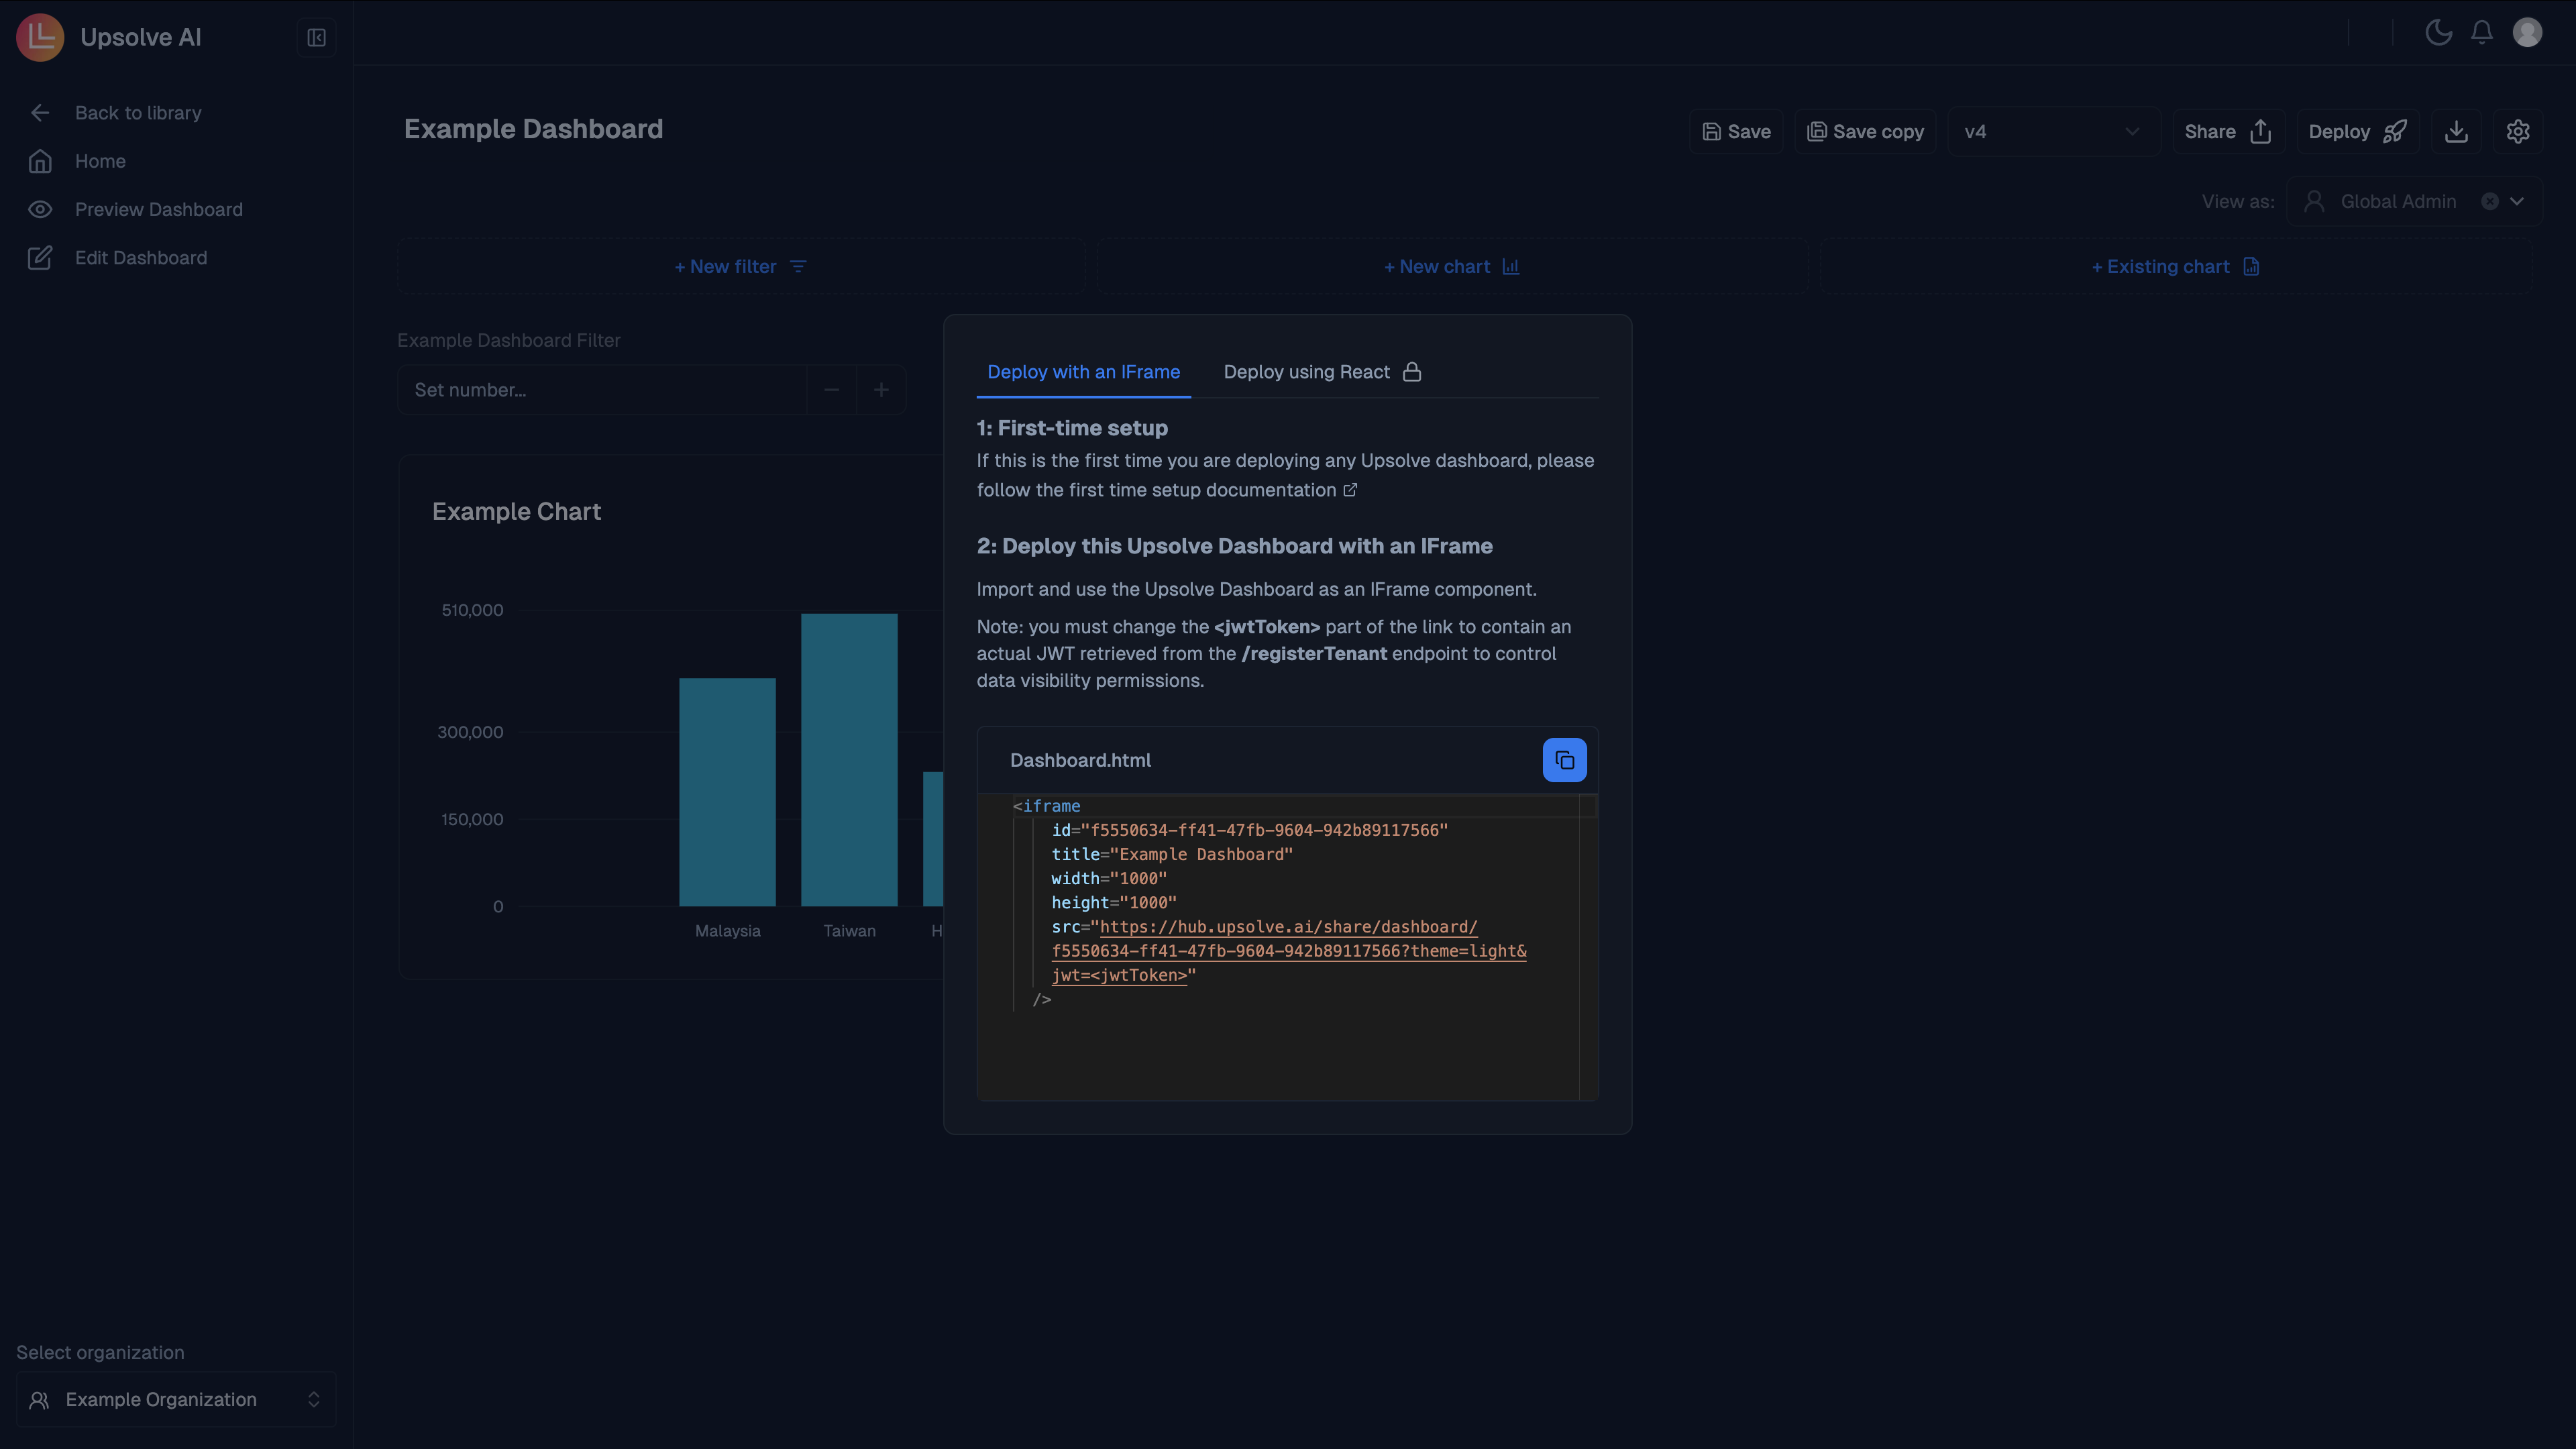 You will need a project user token (JWT) for the current user and your application ID to render the correct space. The token is generated by following the steps in [Backend Setup](/embedded-bi/deploy-dashboards/backend-setup). The application ID is found in your application settings, or in the URL when viewing the application: `/projects/{projectId}/applications/{applicationId}`.
**Important**: Changing the JWT token in the iframe `src` will cause the browser to reload the entire iframe. This happens automatically when:
* The JWT expires and gets refreshed
* User switches organizations
* User permissions are updated
Plan your token refresh strategy to minimize user disruption.
Below is an example of deploying the application with a JWT using [**Clerk middleware**](https://clerk.com/docs/references/nextjs/auth-middleware#use-after-auth-for-fine-grained-control):
```javascript theme={null}
"use client";
import React from "react";
import { useUser } from "@clerk/nextjs";
const Analytics: React.FC = () => {
// Get the user information from Clerk and extract the Upsolve token from the metadata
const { user } = useUser();
const upsolveToken = user?.publicMetadata?.["upsolveToken"];
const applicationId = "your-application-id"; // Replace with your application ID
// Embed the application into your app
return (
<>
{upsolveToken != null && typeof upsolveToken === "string" && (
)}
);
};
export default Analytics;
```
### Understanding JWT Changes and Iframe Refresh
When the `upsolveToken` value changes in the code above, React will re-render the component with a new `src` URL for the iframe. **This causes the browser to completely reload the iframe content.**
```javascript theme={null}
// Example: Token change triggers iframe reload
const Analytics: React.FC = () => {
const { user } = useUser();
const upsolveToken = user?.publicMetadata?.["upsolveToken"];
// When upsolveToken changes (e.g., from token refresh or user switch),
// the iframe src changes, triggering a full browser reload of the iframe
return (
);
};
```
**Common scenarios that trigger iframe reload:**
* Automatic token refresh (every hour)
* User switches between organizations
* User logs out and back in
* User permissions are updated
To improve user experience during token updates: 1. Cache the previous token
until just before expiration 2. Show a loading overlay during refresh 3.
Coordinate token updates during natural breaks in user workflow
For databases with Row-Level Security policies (Postgres, Redshift, or Supabase), you need to include a database auth token (`dbAuthToken`) in the iFrame `src` URL. This token identifies the current user and is used by your database's RLS policies to filter data at the row level.
Example updated iFrame URL:
```javascript theme={null}
```
* **dbAuthToken**: The user-specific identifier that your RLS policies use for row-level filtering
### For Postgres and Redshift
The `dbAuthToken` should contain the value that matches your RLS session variable (e.g., tenant ID, user ID, or company code):
```javascript theme={null}
const Analytics: React.FC = () => {
const { user } = useUser();
const upsolveToken = user?.publicMetadata?.["upsolveToken"];
const dbAuthToken = user?.publicMetadata?.["companyId"]; // Your user's company/tenant identifier
return (
);
};
```
Learn more about setting up RLS for Postgres and Redshift in the [Database Row-Level Security guide](/embedded-bi/data-permissioning/database-row-level-security).
### For Supabase
To retrieve the Supabase session token (`dbAuthToken`), you can use Supabase's `auth.getSession` method:
```javascript theme={null}
import { createClient } from '@supabase/supabase-js';
const supabase = createClient(
'https://your-supabase-project.supabase.co',
'public-anon-key'
);
async function getDbAuthToken() {
const {
data: { session },
error,
} = await supabase.auth.getSession();
if (error) {
console.error('Error retrieving session:', error.message);
return null;
}
return session?.access_token;
}
getDbAuthToken().then((dbAuthToken) => {
console.log('dbAuthToken:', dbAuthToken);
// Use dbAuthToken in the iframe URL
});
```
Refer to the [Supabase API docs](https://supabase.com/docs/reference/javascript/auth-getsession) for more details on managing sessions and tokens.
### Application Query Parameters
The application iframe supports the following query parameters:
| Parameter | Type | Required | Description |
| -------------- | ----------------- | -------- | -------------------------------------------------------------------------------------------------- |
| `jwt` | string | Yes | Project user token for authentication |
| `theme` | `light` \| `dark` | No | Visual theme |
| `dbAuthToken` | string | No | Database authentication token for RLS (see RLS section) |
| `transparent` | boolean | No | Render with a transparent background so your page shows through |
| `filter_{key}` | JSON string | No | Controlled filter values — see [URL Filter Parameters](/embedded-bi/filters/url-filter-parameters) |
| `f_{...}` | string | No | Omnibar filter values — see [URL Filter Parameters](/embedded-bi/filters/url-filter-parameters) |
***
## Deploying AI Chat
Deploy AI chat in your frontend by embedding it as an iFrame.
You'll need a project user token (JWT) for the current user and the agent ID to render the chat interface. The token is generated by following the steps in [Backend Setup](/embedded-bi/deploy-dashboards/backend-setup).
### Getting the Agent ID
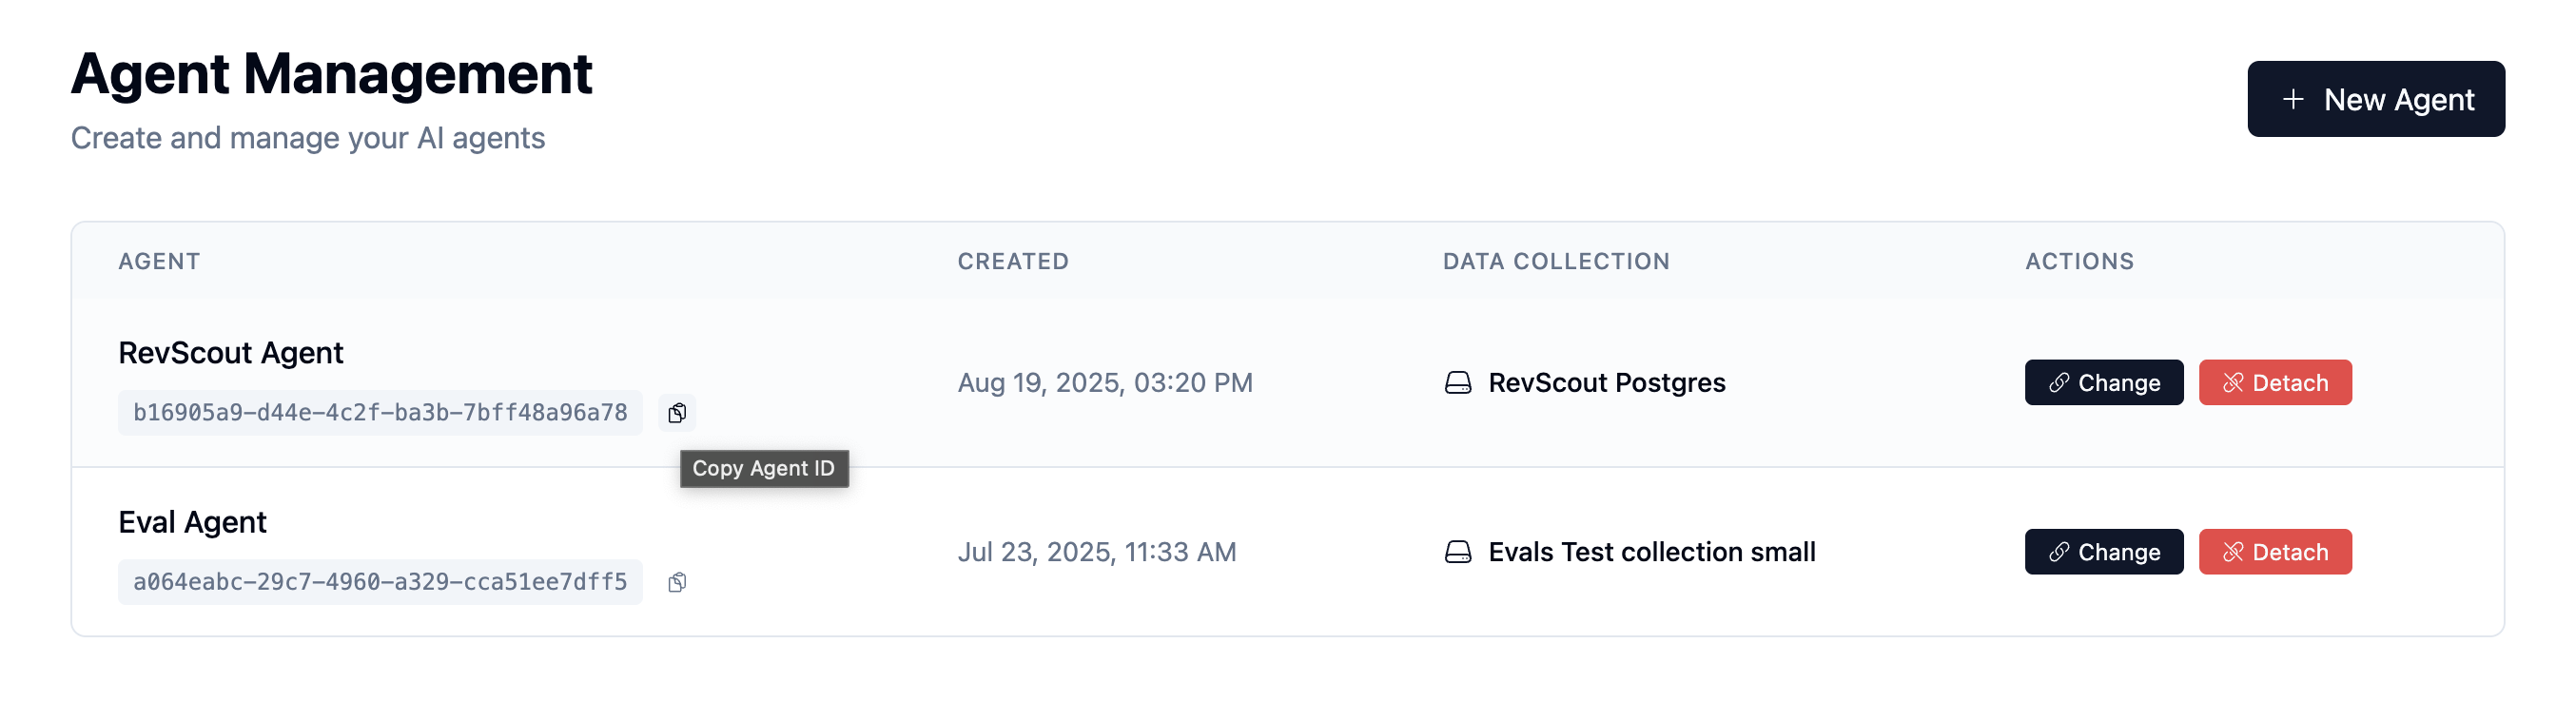
You can find your agent ID by visiting your agents at [https://ai-hub.upsolve.ai/agents](https://ai-hub.upsolve.ai/agents). The agent ID is visible in the URL when you click on an agent, or in the agent list view.
You will need a project user token (JWT) for the current user and your application ID to render the correct space. The token is generated by following the steps in [Backend Setup](/embedded-bi/deploy-dashboards/backend-setup). The application ID is found in your application settings, or in the URL when viewing the application: `/projects/{projectId}/applications/{applicationId}`.
**Important**: Changing the JWT token in the iframe `src` will cause the browser to reload the entire iframe. This happens automatically when:
* The JWT expires and gets refreshed
* User switches organizations
* User permissions are updated
Plan your token refresh strategy to minimize user disruption.
Below is an example of deploying the application with a JWT using [**Clerk middleware**](https://clerk.com/docs/references/nextjs/auth-middleware#use-after-auth-for-fine-grained-control):
```javascript theme={null}
"use client";
import React from "react";
import { useUser } from "@clerk/nextjs";
const Analytics: React.FC = () => {
// Get the user information from Clerk and extract the Upsolve token from the metadata
const { user } = useUser();
const upsolveToken = user?.publicMetadata?.["upsolveToken"];
const applicationId = "your-application-id"; // Replace with your application ID
// Embed the application into your app
return (
<>
{upsolveToken != null && typeof upsolveToken === "string" && (
)}
);
};
export default Analytics;
```
### Understanding JWT Changes and Iframe Refresh
When the `upsolveToken` value changes in the code above, React will re-render the component with a new `src` URL for the iframe. **This causes the browser to completely reload the iframe content.**
```javascript theme={null}
// Example: Token change triggers iframe reload
const Analytics: React.FC = () => {
const { user } = useUser();
const upsolveToken = user?.publicMetadata?.["upsolveToken"];
// When upsolveToken changes (e.g., from token refresh or user switch),
// the iframe src changes, triggering a full browser reload of the iframe
return (
);
};
```
**Common scenarios that trigger iframe reload:**
* Automatic token refresh (every hour)
* User switches between organizations
* User logs out and back in
* User permissions are updated
To improve user experience during token updates: 1. Cache the previous token
until just before expiration 2. Show a loading overlay during refresh 3.
Coordinate token updates during natural breaks in user workflow
For databases with Row-Level Security policies (Postgres, Redshift, or Supabase), you need to include a database auth token (`dbAuthToken`) in the iFrame `src` URL. This token identifies the current user and is used by your database's RLS policies to filter data at the row level.
Example updated iFrame URL:
```javascript theme={null}
```
* **dbAuthToken**: The user-specific identifier that your RLS policies use for row-level filtering
### For Postgres and Redshift
The `dbAuthToken` should contain the value that matches your RLS session variable (e.g., tenant ID, user ID, or company code):
```javascript theme={null}
const Analytics: React.FC = () => {
const { user } = useUser();
const upsolveToken = user?.publicMetadata?.["upsolveToken"];
const dbAuthToken = user?.publicMetadata?.["companyId"]; // Your user's company/tenant identifier
return (
);
};
```
Learn more about setting up RLS for Postgres and Redshift in the [Database Row-Level Security guide](/embedded-bi/data-permissioning/database-row-level-security).
### For Supabase
To retrieve the Supabase session token (`dbAuthToken`), you can use Supabase's `auth.getSession` method:
```javascript theme={null}
import { createClient } from '@supabase/supabase-js';
const supabase = createClient(
'https://your-supabase-project.supabase.co',
'public-anon-key'
);
async function getDbAuthToken() {
const {
data: { session },
error,
} = await supabase.auth.getSession();
if (error) {
console.error('Error retrieving session:', error.message);
return null;
}
return session?.access_token;
}
getDbAuthToken().then((dbAuthToken) => {
console.log('dbAuthToken:', dbAuthToken);
// Use dbAuthToken in the iframe URL
});
```
Refer to the [Supabase API docs](https://supabase.com/docs/reference/javascript/auth-getsession) for more details on managing sessions and tokens.
### Application Query Parameters
The application iframe supports the following query parameters:
| Parameter | Type | Required | Description |
| -------------- | ----------------- | -------- | -------------------------------------------------------------------------------------------------- |
| `jwt` | string | Yes | Project user token for authentication |
| `theme` | `light` \| `dark` | No | Visual theme |
| `dbAuthToken` | string | No | Database authentication token for RLS (see RLS section) |
| `transparent` | boolean | No | Render with a transparent background so your page shows through |
| `filter_{key}` | JSON string | No | Controlled filter values — see [URL Filter Parameters](/embedded-bi/filters/url-filter-parameters) |
| `f_{...}` | string | No | Omnibar filter values — see [URL Filter Parameters](/embedded-bi/filters/url-filter-parameters) |
***
## Deploying AI Chat
Deploy AI chat in your frontend by embedding it as an iFrame.
You'll need a project user token (JWT) for the current user and the agent ID to render the chat interface. The token is generated by following the steps in [Backend Setup](/embedded-bi/deploy-dashboards/backend-setup).
### Getting the Agent ID
You can find your agent ID by visiting your agents at [https://ai-hub.upsolve.ai/agents](https://ai-hub.upsolve.ai/agents). The agent ID is visible in the URL when you click on an agent, or in the agent list view.
 **Authentication via JWT**: Chat iframes use JWT tokens passed via query
parameters for authentication, similar to applications. Users don't need to be
logged into the Hub - they just need a valid JWT token in the URL.
**Important**: Changing the JWT token in the iframe `src` will cause the browser to reload the entire iframe and **reset the chat session**. This happens automatically when:
* The JWT expires and gets refreshed
* User switches organizations
* User permissions are updated
Each iframe load starts a fresh chat session. Plan your token refresh strategy carefully to avoid interrupting active conversations.
Below is an example of deploying chat with JWT using [**Clerk middleware**](https://clerk.com/docs/references/nextjs/auth-middleware#use-after-auth-for-fine-grained-control):
```javascript theme={null}
"use client";
import React from "react";
import { useUser } from "@clerk/nextjs";
const AIChatInterface: React.FC = () => {
// Get the user information from Clerk and extract the Upsolve token from the metadata
const { user } = useUser();
const upsolveToken = user?.publicMetadata?.["upsolveToken"];
const agentId = "your-agent-id"; // Replace with your agent ID
// Embed the chat component into your app
return (
<>
{upsolveToken != null && typeof upsolveToken === "string" && (
)}
);
};
export default AIChatInterface;
```
### Chat Query Parameters
The chat iframe supports the following query parameters:
| Parameter | Type | Required | Description |
| -------------- | ----------------- | -------- | ---------------------------------------- |
| `jwt` | string | Yes | Project user token for authentication |
| `prompt` | string | No | Initial prompt to start the conversation |
| `theme` | `light` \| `dark` | No | Visual theme |
| `isAdmin` | boolean | No | Enable admin features (default: `false`) |
| `hideHeader` | boolean | No | Hide the header UI |
| `themeConfigs` | JSON string | No | Custom theme configuration |
### Example with Initial Prompt
```javascript theme={null}
const AIChatWithPrompt: React.FC = () => {
const { user } = useUser();
const upsolveToken = user?.publicMetadata?.["upsolveToken"];
const agentId = "your-agent-id";
const initialPrompt = "What were our top sales last quarter?";
return (
);
};
```
### Admin Mode
By default, the chat interface runs in end-user mode with simplified views. Set `isAdmin=true` to enable detailed tool execution information:
```javascript theme={null}
```
### Understanding Session Reset on JWT Change
When the `upsolveToken` value changes, React re-renders the iframe with a new `src` URL. **This causes the browser to completely reload the iframe and start a new chat session.**
```javascript theme={null}
// Example: Token change triggers iframe reload and session reset
const AIChatInterface: React.FC = () => {
const { user } = useUser();
const upsolveToken = user?.publicMetadata?.["upsolveToken"];
// When upsolveToken changes, the chat session resets
return (
);
};
```
**Common scenarios that trigger session reset:**
* Automatic token refresh (every hour)
* User switches between organizations
* User logs out and back in
* User permissions are updated
To preserve chat history across token refreshes, consider: 1. Implementing
session persistence on your backend 2. Storing conversation history outside
the iframe 3. Refreshing tokens during natural conversation breaks 4. Warning
users before token expiration
**Authentication via JWT**: Chat iframes use JWT tokens passed via query
parameters for authentication, similar to applications. Users don't need to be
logged into the Hub - they just need a valid JWT token in the URL.
**Important**: Changing the JWT token in the iframe `src` will cause the browser to reload the entire iframe and **reset the chat session**. This happens automatically when:
* The JWT expires and gets refreshed
* User switches organizations
* User permissions are updated
Each iframe load starts a fresh chat session. Plan your token refresh strategy carefully to avoid interrupting active conversations.
Below is an example of deploying chat with JWT using [**Clerk middleware**](https://clerk.com/docs/references/nextjs/auth-middleware#use-after-auth-for-fine-grained-control):
```javascript theme={null}
"use client";
import React from "react";
import { useUser } from "@clerk/nextjs";
const AIChatInterface: React.FC = () => {
// Get the user information from Clerk and extract the Upsolve token from the metadata
const { user } = useUser();
const upsolveToken = user?.publicMetadata?.["upsolveToken"];
const agentId = "your-agent-id"; // Replace with your agent ID
// Embed the chat component into your app
return (
<>
{upsolveToken != null && typeof upsolveToken === "string" && (
)}
);
};
export default AIChatInterface;
```
### Chat Query Parameters
The chat iframe supports the following query parameters:
| Parameter | Type | Required | Description |
| -------------- | ----------------- | -------- | ---------------------------------------- |
| `jwt` | string | Yes | Project user token for authentication |
| `prompt` | string | No | Initial prompt to start the conversation |
| `theme` | `light` \| `dark` | No | Visual theme |
| `isAdmin` | boolean | No | Enable admin features (default: `false`) |
| `hideHeader` | boolean | No | Hide the header UI |
| `themeConfigs` | JSON string | No | Custom theme configuration |
### Example with Initial Prompt
```javascript theme={null}
const AIChatWithPrompt: React.FC = () => {
const { user } = useUser();
const upsolveToken = user?.publicMetadata?.["upsolveToken"];
const agentId = "your-agent-id";
const initialPrompt = "What were our top sales last quarter?";
return (
);
};
```
### Admin Mode
By default, the chat interface runs in end-user mode with simplified views. Set `isAdmin=true` to enable detailed tool execution information:
```javascript theme={null}
```
### Understanding Session Reset on JWT Change
When the `upsolveToken` value changes, React re-renders the iframe with a new `src` URL. **This causes the browser to completely reload the iframe and start a new chat session.**
```javascript theme={null}
// Example: Token change triggers iframe reload and session reset
const AIChatInterface: React.FC = () => {
const { user } = useUser();
const upsolveToken = user?.publicMetadata?.["upsolveToken"];
// When upsolveToken changes, the chat session resets
return (
);
};
```
**Common scenarios that trigger session reset:**
* Automatic token refresh (every hour)
* User switches between organizations
* User logs out and back in
* User permissions are updated
To preserve chat history across token refreshes, consider: 1. Implementing
session persistence on your backend 2. Storing conversation history outside
the iframe 3. Refreshing tokens during natural conversation breaks 4. Warning
users before token expiration